
Hut to Hut Hiking in the Dolomites: Tips for First Timers

This summer we hiked hut to hut in the Dolomites on the Alta Via 2. The first half as a couple, the second half as a family. The Dolomites are beautiful and awe inspiring, likely the most amazing mountains I have ever seen. They are also humbling and potentially dangerous if you are not properly prepared and equipped.
Here is what you should know as a first time hut to hut hiker in the Dolomites:
1) Use a Trekking Company
For us it was never a question of whether we were going to use a trekking company, just which one to use. The mountain huts (rifugios) book up early (we locked ours in 9 months before the hike), and you have to really understand your route in order to book the right ones. If they are too close together, you sit around and wait for check-in. If they are too far apart, you might struggle to get there in time for dinner. If you don’t pay close attention you might end up on a trail that’s way beyond your technical abilities. We used Monttrekking for our hike and had a great experience. We chose an unguided hike and Monttreking set us up in a way that we felt comfortable. A tracking app was provided to us for free and also a file to download our hike specifics into the app. This way we never got lost and the app would confirm our locations in real time should we ever be not sure. We also had paper maps just in case and were given a detailed daily itinerary. The itinerary also included potentially available shortcuts and additional side hike options for the extra ambitious. When we had itinerary changes and additions, Monttrekking was always reachable through their 24/7 emergency phone line and what’s app connection. They also made arrangements for our luggage and our children (kids joined us halfway through the trip at one of the lower huts) Thank you, Monttrekking!

2) Know your Fitness Limits: Daily Distance and Elevation Gain
I consider my husband and myself experienced and well trained hikers. We have hiked the Grand Canyon rim to rim, we summited Mount Whitney several times, we hiked the Inca trail to Machu Picchu, we succeeded in the 29029 Everesting hiking challenge, and we summited Mount Kilimanjaro only two years ago. While we have not much technical expertise, we are fit and work out a lot. In the US (but also in Peru and Tanzania), we tended to be on the "faster" side of things and regularly undercut the officially suggested time it should take to hike a trail section. This ended up not being the case in the Dolomites. It tended to take us at least the suggested time, if not longer, to reach our destination. Trails tended to be steeper than we had encountered in other places and the hikes - generally speaking - were more demanding than expected. For less trained hikers this could have caused some real problems. For reference: our hike was considered level 4 and consisted of daily distances of around 10 miles and elevation gains of 3,500 to 4,000 feet.

3) Know your Comfort Limits: Heights and Steep Sections
I have a humongous fear of heights, which is why we opted out of any via ferrata sections on this hike. We were still advised to bring the ferrata gear which involves a helmet, gloves, a harness, and a leash with two carabiners to attach yourself safely to the provided steel cables. When assessing our trail, it was mostly marked as "standard" (solid line), no “via ferrata” (crossed line), and some short sections as "more difficult" (dotted line). I want to talk a little bit about the “dotted lines”. These were hard to anticipate, and you didn’t really know what you were going to get. There was scrambling up and down rocks which was fine and fun. There was a ladder and metal stepping hooks above hundreds of feet of nothingness, and all secured through steel cables. This was scary but fun as well. But there were also unsecured sections that could have been very dangerous with one wrong step. Most people didn't mind any of this at all, but if you have a fear of heights AT ALL, this is difficult! And if you bring and feel responsible for your children on this hike, and then they get scared as well, this is difficult as well! In the end, for me all but one of these trail sections ended up being very very fun, as they helped me overcome a known fear, but it's important to be aware that these sections exist and to make informed decisions.

4) Set Expectations about the Huts (Rifugios)
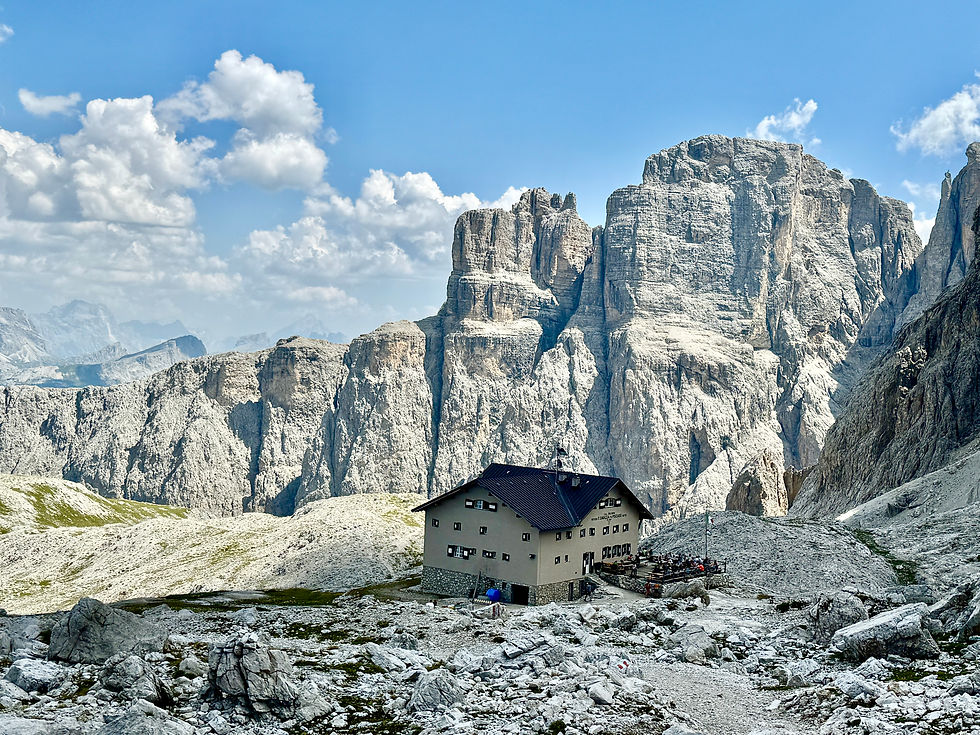
Unlike any other mountains I have ever hiked anywhere in the world, the Dolomites are blessed with hundreds of mountain huts (rifugios) that allow you to sleep on the mountain and continue your hike the next morning from a beautiful vantage point already at high altitude. These rifugios offer basic accommodations, showers and meals. Dinner (upon arrival) and breakfast (before departure) are usually included in your rate. Check-in is usually at 4pm, checkout around 8am.
Hiking to the rifugios was a true highlight for me. When the day hikers left after lunch, the huts became more quiet and only the overnight hikers were still around. It created a community feeling of like minded hikers that I particularly enjoyed. Watching the sunset at Rifugio Boe after dinner was one of the favorite experiences of the whole trip. Sleeping in the rifugios makes your hike counter cyclical and allows you to be on empty versus crowded trails. The only people you encounter in the morning are other hikers who slept on the mountain, versus larger crowds starting from a parking lot below.
We were lucky enough to stay in some wonderful huts with super friendly staff and high quality food (my favorites were Rifugio Boe and Rifugio Capanna Cervino).
Having said that: not all huts are created equal, and in my mind it’s worth doing some digging into the specifics before you commit to one versus another. Some huts provide double or triple rooms, others only have dorms (where you will be assigned a dorm room and then bed choices are on a first come first serve basis). Some rifugios offer private showers, but most don’t. Be prepared to share sinks, tables, outlets etc with other people. Most rifugios sell shower tokens and limit water usage by restricting the number of minutes the shower will run. Some rifugios let you take your shower until bedtime, others turn the water off at 5pm…..at least once we missed the shower cutoff time and slept in our dirty hiking gear. It’s not luxurious, it’s an adventure!
Most huts have wifi and sell basic amenities, but some don’t. If you know you need wifi access on a particular day, plan carefully!

5) Buy the Right Equipment
This goes for every hiking trip, but especially if you go up to higher elevation levels and beyond the tree line: I think it’s very advantageous to have high hiking boots versus low hiking shoes. Boots protect your ankles from twisting but also keep debris and rocks out of your socks. Check your boot tread and ensure proper boot traction so you don't slip. Doesn’t hurt when they are waterproof either….we encountered creek crossings and muddy paths.
Make sure you have a backpack that is large enough (at least 35-40 liters for a multi day trip), that has a sturdy back support and a strong waist belt so the weight of the pack sits on your hips and not on your shoulders. Get a waterproof rain jacket versus a water repellant one….after 30 minutes in the rain or hail you will know the difference. Invest in a good (and very light) pair of hiking poles, preferably aluminum. Poles can make your life so much easier. Make sure you have access to a hiking app like Outdooractive (which we used) or Alltrails, and download your trail before you go (and while you still have wifi)
6) Pack Wisely
You will be carrying all your clothes, snacks, toiletries, medicines, water - really everything you need for the entirety of your trip - on your back for the days of your hike. Pack wisely!!! T-shirts and pants can be worn more than once (and washed). Microfiber towels are small, weigh nothing, and are totally enough for your 1 minute shower. Make up, hair dryers, extra creams and potions……you will not want to carry them, and nobody cares. Bring poles: they are so very useful for downhill portions and any type of scrambling.
When sleeping in the rifugios you should expect to need a sleeping bag liner (pillows and blankets are usually provided) and a pair of slides or flip flops for the hut (no hiking boots allowed inside). Bring a bladder (water reservoir) for the hike, but also a plastic bottle for the night at the hut. Bring a top notch medical and first aid kit, because nothing kills the mood more than someone getting sick and having no medication. My go-to items to bring are Tylenol, cold sore medication, antihistamine, UTI anti burn, Z pack just in case (prescription), Dayquil, NyQuil, Compeed and Liquid Skin for blisters, plenty of bandaids. If you are sensitive to altitude you might also want to get your doctor to prescribe some Diamox for altitude sickness. We didn’t need it in the Dolomites, but took it for most of the other big ones.
Bring a rain jacket. Thunderstorms and showers in the later afternoon are very common. I also always pack an emergency kit with an aluminum blanket, an extra rain poncho and a whistle. It should also contain a headlamp in case you get delayed on the trail (but also for a trip to the bathroom in the middle of the night at the hut).
Bring an external charger/powerbank and make sure it’s fully charged. The hiking app can really drain your battery and you don’t want to run out of power when you need to find your way on the app.
When solo hiking, I also always bring a Garmin GPS locator in case of an emergency, bear spray (animal predator, sprays far) and pepper spray (human predator, sprays close), but on this hike it felt not necessary. Trails seemed frequented enough that within half an hour or so other hikers usually crossed our path.
And lastly, bring a few extra carabiners and bungie cords to attach/secure items to the outside of your backpack. (We had the water bottle hanging off a carabiner and attached the helmet with a bungie cord.)

7) Enjoy your Hike!
The Dolomites are breathtaking and ever changing. Every day brings new views and different trail conditions. Take it all in, take lots of photos and recharge the soul!

These are some of the things I learned on my own very first hut to hut trip…..I hope they are useful to you! This was an amazing trip through breathtaking landscapes and I can’t wait to go back! Please reach out with any questions!


Comments